Showing posts with label DIY. Show all posts

Thursday, December 8, 2011

DIY Bat Invitation Tutorial

When & Where Invitations

These adorable articulated bat invitations from When & Where Invitations have wings that really flap!  Who wouldn't come to this party?  Check out the full tutorial at the link.

Monday, December 5, 2011

DIY Duct Tape Topiary

Poppies at Play

I love this sweet, surreal-looking duct tape topiary on Poppies at Play.  Not only would it make a fantastic Halloween centerpiece, but I think that, done in different colors, it would work well for other holidays.  Red for Valentine's Day, perhaps?  See the full tutorial at the link.

Saturday, November 26, 2011

DIY Embroidery Hoop Wreath


This delicate wreath, made of miniature embroidery hoops, makes a great Halloween decoration, but could easily be retooled for other holidays.  Christmas isn't that far away, and those spooky cobwebs could easily become pretty snowflakes.  Full tutorial from the Craftzine blog at the link above.

Saturday, November 19, 2011

Spiderweb Memo Board


This spiderweb bulletin board by the Greenbean Crafterole is great because it's more than just a one-time seasonable decoration.  I'm always taping notes up to my window, or pinning them to the wall near my desk, so I'd love to have a board like this up on my wall all year round, to keep me organized and maintain a little Halloween spirit throughout the year.

Wednesday, November 16, 2011

Last-Minute Superhero Costumes

Whether you're indulging in Ghostbusters nostalgia or gearing up for the release of Dark Knight Rises, here are some last-minute Halloween superhero costume ideas.

And in case that's not enough, here are 20 last-minute sci-fi costumes for the procrastinating SF fans.

Thursday, October 27, 2011

Halloween Chalkboard

While browsing my local Jo-Ann Fabric, I came across a cheap wood-framed slate, and I decided to turn it into a cute little Halloween chalkboard.

You Will Need:

Framed slate (about $3 at Jo-Ann Fabric)
Masking tape
Orange acrylic paint
Paint brush
Rubber stamps
Ink pad
Other decorations (I used buttons and some cut-out bats from some Halloween scrapbooking paper)
Glue

Start by blocking off the inside edge of the slate's frame with masking tape, to prevent the paint from running onto the slate.  If you have a very steady hand, maybe you don't need to worry about this, but I'm a sloppy painter, so it helped me.  The good news for us slobs, though, is that if you make a mess, the acrylic paint can easily be cleaned up with a little soapy water.

Paint your frame.  It took several coats before I'd achieved a nice, opaque orange.

Once the paint is dry, remove the tape and block out the words you'd like to stamp onto your frame.  In the interest of keeping things simple, I went for "Happy Halloween," but obviously you can do anything you like.  Be sure to map out the placement of the letters so that you have enough space.  That said, I mapped mine out and still wound up with some crooked, off-kilter words, so to each according to her abilities, I guess.

At this point, you may want to spend some time playing around with the placement of your decorative bits and bobs at this point.  I wound up using two paper bats from a $1 package of Target scrapbooking paper and and three buttons of various sizes.

Once you're happy with the arrangement, glue on decorations.  Let them dry.

Grab some chalk and write a message!

I think this chalkboard would be great to put beside a bowl of candy if you won't be around to hand treats out on Halloween night.  I've been using mine to fill my hankering for a Halloween advent calendar, with a chalked-in countdown -- although I keep forgetting to change the numbers!

Monday, October 24, 2011

Mockingjay Pumpkin Template

If you feel the need to alert the neighbors that you not only love Halloween but also adolescent death matches, then check out this awesome Hunger Games-themed jack-o-lantern by So Geek Chic!


[Via The Mary-Sue]

Sunday, October 16, 2011

Halloween Rock Paintings

Crafting with Kids
 If you're looking for a Halloween project to do with young children this weekend, why not try some Halloween rock painting?  I'm not sure what you'd do with them once you're done, but it would be fun to go out looking for spooky stones.  I love the one that looks like Frankenstein's monster -- such a good fit for its shape!

Thursday, October 13, 2011

Black & White Pumpkins

Chica and Jo
I've been seeing a lot of beautiful black and white pumpkins recently, such as this awesome zentangle pumpkin by Chica and Jo.

If the crazy zentangle designs are a bit too complex for you, here's a tutorial for cute, simple Missoni-inspired zigzag pumpkins!

It seems that painting the pumpkins white, so to speak, gives decorators a whole new lease on the idea of pumpkin as canvas.  You can go simple, with monochromatic polka-dots or monograms, or you can try a little tromp-l'oeil, or you can create black and white toile patterns using Modge Podge and patterned paper napkins.  All these designs look elegant while still capturing a kind of Tim Burton strangeness that is so essential to Halloween.

Tuesday, October 11, 2011

DIY Halloween Blocks

Poppies at Play

I love these adorable Halloween letter blocks!  The very simple instructions, along with downloadable print-outs for the letters, are here.

[Via The Crafter's Cafe]

Saturday, October 8, 2011

DIY Halloween Paper Lanterns

I've been seeing a lot of awesome Halloween paper lanterns recently -- like these, these, these and  these from Pottery Barn, and these, for example.  But instead of paying between $10 and $25 for some readymade lanterns, I decided to try my hand at making my own, so I bought a $5 string of paper lanterns at my local Five Below and got to work.  What I wound up with is, I think, fun and customizable, and much more personal than the store-bought versions.

You Will Need:

A string of lighted paper lanterns
Glow-in-the-dark acrylic paint
Paint brush
Paint receptacle (I used a takeout lid)
Pencil
Sharpie
Scissors
Halloweeny templates or stencils
Newsprint-covered work surface

Untangle your lanterns and spread them out on a newspaper-covered work surface.

Brush a coat of glow-in-the-dark paint onto each lantern.  Let this dry, then repeat.  I used two coats, and my lanterns glow very faintly in the dark.  If you want a more robust glow, you may want to do three or four coats.

While your paint is drying, decide what images you want to put on your lanterns.  I used this bat from Good Housekeeping and this raven.  You could also do spiders, haunted houses, or whatever else your spooky heart desires.  Resize your images to fit and cut them out.

Once the paint is dry, hold your stencils up to the lanterns and trace the outline with a pencil. (The duller the pencil, the better, so you don't poke holes in the paper!)  I fit two images on each lantern, and alternated the pattern, but you can arrange them any way you like.

Color in your outlines with Sharpie.  You could also fill them in with black paint, but I feel like I have more control with a pen, and I also wound up liking the kind of distressed-looking results of the streaky ink.

Once the ink is dry, you're ready to hang your lanterns and admire!  Be sure to expose the lanterns to a generous dose of light to activate the glow-in-the-dark paint.


I suspect that you could also cut your spooky shapes out of black tissue paper and paste them onto your lanterns if you so chose, although that seems a bit more fiddly to me, and doesn't involve the dubious pleasures of a marker high.  It would also be fun to find some orange lanterns and do Jack-o-hanging-lanterns.  Next time, perhaps!

Also, if you're really not in a DIY mood, Five Below has the best deal I've seen on Halloween lanterns, with $5 strings of Halloween-print lanterns.  You can locate the nearest store here.

Friday, October 7, 2011

DIY Halloween Tree

Paint Me Plaid
I love this simple, spooky wire Halloween tree from Paint Me Plaid.  Not only does it look easy to make, it could be infinitely elaborated upon.  Check out the full tutorial here.

Friday, September 30, 2011

Last-Minute Superhero Costumes

Whether you're indulging in Ghostbusters nostalgia or gearing up for the release of Dark Knight Rises, here are some last-minute Halloween superhero costume ideas.

And in case that's not enough, here are 20 last-minute sci-fi costumes for the procrastinating SF fans.

Thursday, September 29, 2011

Leafy Pumpkin

From Good Housekeeping
This leafy pumpkin from Good Housekeeping's seasonal decorating slideshow is so pretty!

Normally I don't go in for the more artsy pumpkin decorating ideas, even when I find them really lovely (no lacework pumpkins for me -- sorry, Martha).  I tend to be more of a straight-forward spooky face kinda girl.  But I really like this one. 

It would look nice, indoors, as well, so it wouldn't necessarily have to replace a more traditional  pumpkin on the front step.

If you're in a pumpkin state of mind, Good Housekeeping also has a fuller list of no-carving-required pumpkin ideas (the little ribbons are my favorite) and instructions for a pumpkin candy dish and pumpkin picture frame.

Wednesday, September 28, 2011

DIY Gothic Votive Candles

 I love these elegant candle decorations by Julie Ann Art.  They'd make a great addition to any well-turned-out haunted house.  The tutorial, as well as some links to other great Halloween craft projects (including cookie-cutter jack-o-lanterns and a bat-printed table runner), is here.

Tuesday, September 27, 2011

6 Homemade Kids' Costumes


Rookie Moms has links to six great DIY children's Halloween costumes, and if this marvellous Max costume from Where the Wild Things Are isn't enticement enough to check out the list, then I don't know what it.

Sunday, September 25, 2011

Halloween Advent Calendar

I'd love to make a Halloween countdown calendar.  I don't know if I need an elaborate self version stuffed with treats like this one by restlessrisa, but it would be a great way to build anticipation for the long-awaited day.  So until I make one of my own, here are some other Halloween advent calendars for inspiration.

(c) Futuregirl_LeahRiley, via Flickr
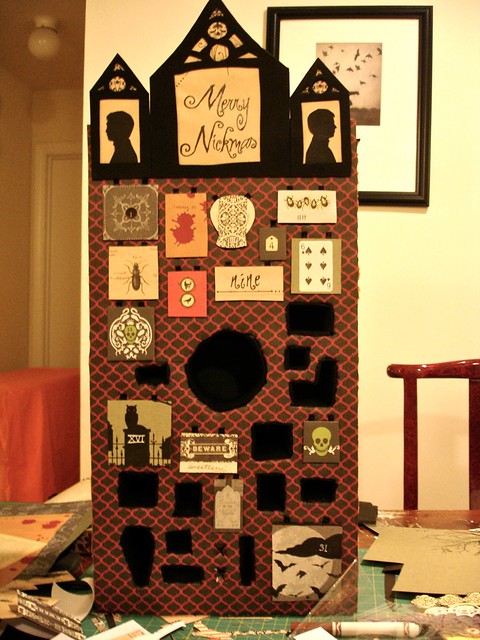
I think this spooky house calendar by Futuregirl_LeahRiley is my favorite.  Inspired by this advent tutorial on Crafster, it uses a foam slab to create little cubbies to hide surprises in.

Not only are there lots of great prints going on, but the wonderful silhouetted windows at the top remind me of the animation from A Series of Unfortunate Events.  I think this calendar is cute without being too kistchy - or too goofy-looking, which is my complaint about a lot of of Halloween merchandise.  There's an eerie vintage feel here that I really like, and I'd love to come home to see it on my windowsill every evening.

Sadly, I think this pattern is a bit too involved for me.  I'm crafty, but not exceptionally handy, and I think a 3-D version with so much cutting of holes and laying out of paper would probably be my undoing. 

From Woman's Day
On the other hand, this handsome riff on the Halloween tree from Woman's Day would be much simpler to make.

All I'd need for this one would be a shapely tree branch, black spray paint, and moderate sewing skills (which I have!).

I like the idea of hanging the treats in these little sachets (one could even embroider them with the days of the month), and I think advent element adds a nice sense of purpose to something I've always considered a kind of silly Halloween decoration.  In my opinion, the absurdity of the Halloween tree is surpassed only by the truly ridiculous Easter tree.  I mean, at least dead trees are part of the iconography of Halloween, but nobody will convince me that hanging eggs from a tree makes any sense at all.  [Via Ucreate]

Via Rhinestone Armadillo
Even simpler still is this cabinet-style countdown calender.  The one at left, which includes the Halloween tree pictured, is available from Christmas Traditions - nothing simpler than buying it new, after all.  But it would be fun to create one's own version, using a little set of drawers, or a jewelry box of some kind.  Imagine repurposing a full-size library card catalog to this task!  [Via Rhinestone Armadillo, including several more calendars at the link]

These have given me some good ideas, but I don't think I'm quite ready to decide on any one style.  I'll keep thinking and report back if I ever some up with something good. 

Friday, September 23, 2011

Halloween Crafts With Kendra


The gumball machine costume tutorial in this video is, admittedly, genius, but what makes it an absolute winner is the stop-motion skeleton host.  I wish all craft how-tos were hosted by skeletons!

Lucky for me, there's a whole series of skeleton tutorials from Holidash, including owl, highway, and mad scientist costume tutorials, and some easy decorations instructions.  You can also check out the whole Holidash Halloween archive here.

Halloween Wreath Cookie Recipe

One of my favorite Christmas cookies is a pretty green wreath made of cornflakes and marshmallows that uses red hots for holly berries.  I love these easy no-bake treats so much that I decided to retool them for my favorite holiday -- Halloween.  So here's a recipe for what I'm calling . . .

Halloween Wreath Cookies
Adapted from a recipe in Rose's Christmas Cookies by Rose Levy Beranbaum

You will need:
4 oz unsalted butter
3 cups marshmallows
orange food coloring (or red and yellow mixed)
1 teaspoon vanilla extract
4 cups of cornflakes (I used Special K because it was on sale)
Halloween-themed sprinkles (I used ghosts and bats)
flat work surface covered in wax paper
nonstick cooking spray
large saucepan
wooden spoon
spatula

In your saucepan, melt butter over a low heat.  Add the marshmallows and stir them until they're completely melted and smooth (about 6 minutes).

Remove the pan from heat and whisk in food coloring and vanilla.  Add more food coloring than seems necessary; you really want the color to be deep and bright so that it doesn't wind up getting diluted when you add the cornflakes.

Stir in the cornflakes, making sure they are well coated in the orange marshmallow goop.  (At this point, Berenbaum recommends keeping the mixture warm by placing your saucepan in a larger saucepan of hot water.  I've never found I needed to do so, but it might be helpful if you're meticulous or are working with young children.)

Spray your fingers with non-stick spray and pick up a handful of the cornflake-marshmallow mixture.  Plop this down on the wax paper and mould it into a donut shape using your hands.  (Berenbaum recommends using two greased spoons, but my hands always get covered in marshmallow anyway, so I don't see any point in making even more dishes.) 

Sprinkle each wreath with a smattering of sprinkles while it's still sticky.  (You may want to pat them into place so they stay put.)  Continue working until you've used all the cornflake mixture.

Let the wreaths cool and solidify, then store in an airtight container.  I find it helps to use a greased spatula to slide the wreaths off the wax paper, as they can be a bit fragile and hard to handle even once they've firmed up.

Since this recipe is essentially the same as a Rice Krispie Treat, you can also pack the cornflake-marshmallow mixture into a baking pan and cut it into bars, which would be a great, easier-to-transport alternative for a seasonal bake sale.  Either way, it makes a tasty treat that's always been a hit at my holiday parties.

Pregnant Skeleton Costume


This awesome pregnant skeleton costume is one of the best riffs I've seen on the classic skeleton T-shirt.  The link includes a tutorial for what would certainly make an excellent and easy last-minute costume for an expectant mother.

Make It and Love It also has several more Halloween crafts (including some great Disney costume how-tos) amongst their holiday freebies.